
RECOMMENDED TOOLS
- Smart phone with Starlink App installed
- Cordless drill / impact driver
- Phillips head screwdriver
- Hex keys: 3/32” , 5/32” , 3/16”
- Spade bit: 19mm (3/4”)
- Drill bits: 2mm (3/32”), 6.5mm (1/4”), 8mm (5/16”), 13mm (1/2”)
- Pencil or thin tip marker
- Wrench: 7/16”
- Socket wrench with 7/16” socket
WHAT’S IN THE BOX

- Plan Your Mounting Location
- Vehicles: Take extra care if installing Starlink on a moving vehicle or vessel. Ensure that the mount is installed on a structurally sound, horizontal surface away from other equipment to give Starlink a clear view of the sky. Equipment falling due to poor installation practices can cause serious accidents resulting in bodily injury. Do not mount the Starlink on any vehicle if it is not stable, or if it cannot be properly secured as described in this guide. To minimize the effects of wind shear, orient the wedge mount so the low end is pointing toward front of the vehicle or trailer.

- Radio Interference: Starlink transmits and receives signals in the Ku-band spectrum. At a minimum, Starlink should be installed 1 meter away from other RF-emitting antennas. Prior to final installation, we recommend turning on the Starlink while using any other radio devices that will be nearby to ensure all devices continue to operate as designed. Install your Starlink at a reasonable distance from these devices if interference occurs.
- Vehicles: Take extra care if installing Starlink on a moving vehicle or vessel. Ensure that the mount is installed on a structurally sound, horizontal surface away from other equipment to give Starlink a clear view of the sky. Equipment falling due to poor installation practices can cause serious accidents resulting in bodily injury. Do not mount the Starlink on any vehicle if it is not stable, or if it cannot be properly secured as described in this guide. To minimize the effects of wind shear, orient the wedge mount so the low end is pointing toward front of the vehicle or trailer.
- Mark the Pilot Holes
- Remove grey wedge mount from box and place atop the command center service closet so the lower end of the wedge is facing the front of trailer. Align the mount so it is parallel to side of the trailer.
- Mark the location of the four holes on your Wedge Mount using a pen or pencil. Drill the holes with a 6.5mm (0.25in) drill bit. Remove burrs around holes and make sure the surface is free of debris.

- Apply Sealant and Screw in Wedge Mount
- Apply Dicor self-leveling lap sealant into the holes and set the wedge mount in position. Liberally apply Dicor sealant to the included lag bolt threads and insert the lag bolts with a washer. Use the drill with 7/16” socket to drive screws ~90% in.. Use the socket wrench to tighten screws to snug plus 1/4 turn; do not overtighten. Cover top of the lag bolts with Dicor sealant.

- Apply Dicor self-leveling lap sealant into the holes and set the wedge mount in position. Liberally apply Dicor sealant to the included lag bolt threads and insert the lag bolts with a washer. Use the drill with 7/16” socket to drive screws ~90% in.. Use the socket wrench to tighten screws to snug plus 1/4 turn; do not overtighten. Cover top of the lag bolts with Dicor sealant.
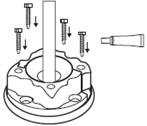
- Install Shoulder Bolts
- Place the Starlink face-down on a clean surface free of debris. Gather the included Loctite and allen head shoulder bolts. Wet shoulder bolt threads with the thread locker and install into threaded holes near the cable port. Use an 1/8” hex key to tighten the bolts 90%. Set the Starlink aside.

- Place the Starlink face-down on a clean surface free of debris. Gather the included Loctite and allen head shoulder bolts. Wet shoulder bolt threads with the thread locker and install into threaded holes near the cable port. Use an 1/8” hex key to tighten the bolts 90%. Set the Starlink aside.
- Install Cable Gland & Route Starlink Cable
- Gather the included cable gland kit. Use the 3/4” (19 mm) spade bit to drill a clearance hole to the interior for the Starlink cable. Remove burrs around the hole and make sure the surface is free of debris.

- Wet the included brass drill tube with soapy water and slowly drill a clearance hole in the middle of the rubber plug.

- Using the box cutter, cut cut the rubber plug from the cable hole to the outer wall.

- The Flat High-Performance factory 25m Starlink cable is proprietary. The smaller end connects at the PSU inside the facility and the larger end connects at the Starlink. Route the Starlink cable from the outside through the drilled hole. Place the rubber base gasket around the mounting hole.
- Combine the two halves of the plastic base and mount onto the rubber gasket ensuring alignment with gasket holes. Screw down the base with the 4 wood screws.

- Wrap the rubber plug around the cable and press it into the base. Leave 1.5’ (0.5 m) of cable outside for future connection to the Starlink.

- Combine the two halves of the outer shell and seat onto the base ensuring the holes in the inner shell and outer shell are aligned.

- Apply silicone sealant to the four machine screws and hand tighten until snug.

- Gather the included cable gland kit. Use the 3/4” (19 mm) spade bit to drill a clearance hole to the interior for the Starlink cable. Remove burrs around the hole and make sure the surface is free of debris.
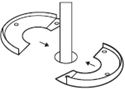
- Lock Starlink onto Wedge Mount
- Turn the Starlink right side up and align the Starlink shoulder bolts into the keyway on the bottom of the wedge mount assembly. Push down and slide Starlink forward to lock into place. Hand tighten the shoulder bolts.

- Turn the Starlink right side up and align the Starlink shoulder bolts into the keyway on the bottom of the wedge mount assembly. Push down and slide Starlink forward to lock into place. Hand tighten the shoulder bolts.
- Secure Starlink to Wedge Mount
- Wet threads of the 12.7 mm (0.5 in) socket head bolts with thread locker and install into the two remaining holes to secure Starlink. Use the 3/16 in hex key to tighten screws to snug plus 1/4 turn. Do not overtighten. Ensure you are using the 12.7 mm (0.5 in) length bolts. Longer bolts can damage Starlink.

- Wet threads of the 12.7 mm (0.5 in) socket head bolts with thread locker and install into the two remaining holes to secure Starlink. Use the 3/16 in hex key to tighten screws to snug plus 1/4 turn. Do not overtighten. Ensure you are using the 12.7 mm (0.5 in) length bolts. Longer bolts can damage Starlink.
- Connect Starlink
- Plug the Starlink cable into the port on the bottom of the Starlink. Ensure the cable is fully plugged in and push the latch into locking position until you hear or feel a click.
- NOTE: Do not make sharp turns with your cable, use a minimum bend radius of 2” (50 mm).
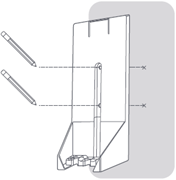
- Power Supply Unit Install
- Starlink Flat High Performance includes a proprietary 5-meter (15ft) ethernet cable for connection to third-party routers. If a longer proprietary cable is required, Simetry stocks the 30-meter ethernet cable. Contact your Simetry sales representative for purchase.
- For RV’s and command trailers, the service closet is an ideal mounting location.
- Remove the power supply from its mount and select a mount location no more than 1.8 m (6ft) away from a 110vAC power source. Checking for straightness, mark the location of the two holes on your Power Supply Mount using a pen or pencil.
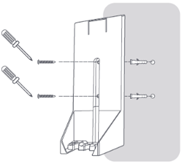
- Holding the mount in place, screw the included mount screws into the backboard until securely attached. Do not overtighten in a way that strips the screws out from the wall.
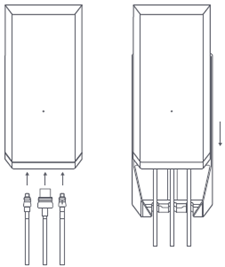
- Plug in Power Supply Unit and Activation
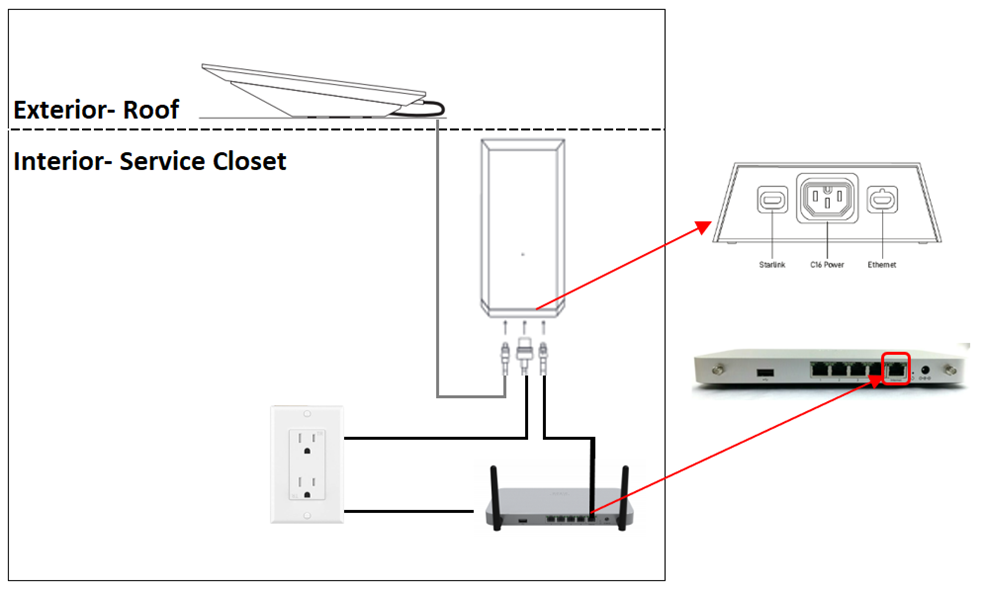
- Plug the Starlink, AC and Ethernet cables into the power supply. Slide the power supply into the mount, making sure the top clip snaps into place.

- Finish installation by routing the Ethernet cable to your router install location, connect to router and plug in router and power supply into your power source.
- Upon power up, Starlink Flat High-Performance takes 4 to 7 minutes to calculate orientation and enter the network. During the first 12 hours of service, Starlink will optimize performance. If any software updates are available, Starlink will download and apply them via an automatic reboot the next day between 2 to 4 AM local time. This reboot will interrupt service for 4 to 7 minutes.
- The flat high-performance kit does not include a router or a HTML web interface. If a router is not present, connect the ethernet cable to a laptop and verify internet access.
- Plug the Starlink, AC and Ethernet cables into the power supply. Slide the power supply into the mount, making sure the top clip snaps into place.
System Cabling Diagram
Using a Starlink Router
- If a Starlink router is present, secure the router to the service closet wall and connect the Starlink ethernet cable to the router’s antenna port. Plug in the AC power cable.
- Step through the Starlink install process using the Starlink App to configure the router WiFi settings and verify internet access.
- Using a Third-Party Router
- If a compatible third-party router is present, follow the router’s set up instructions to configure the WAN port. Connect the Starlink ethernet cable to the router’s internet port and verify internet access.
- If Simetryhas supplied a third-party router (Cisco Meraki), the router has been tagged and pre-configured for use. Place the router on the command trailer desk near the service closet and secure it using the provided 3M adhesive tape. Route the Starlink ethernet cable from the service closet through an existing or new cable penetration and plug it in to the router’s Internet port. Plug in the router AC power cable. After 5 minutes, ensure the LED light on the front of the Cisco Meraki is now white.
- If the Cisco Meraki is equipped with WiFi capabilities, ensure both WiFi antennae are securely connected. Connect to the WiFi network following the provided instructions and verify internet access.
- Service Line Activation
- For ease of product support, Simetry assigns each purchased Starlink an asset number, STL-xxxx. Locate your kit’s Simetryasset # and contact our 24/7 helpdesk for activation:
- phone: 1-833-746-3879
- email: support@simetry.com
- If your company has credit terms, Simetry will process an activation within minutes of any request. Once activation has been completed, reboot the Starlink and service will commence within 4 to 7 minutes.
- Simetry activates all Starlink service lines with the IP policy set to “Default”. If a Public IP address is required, submit a request to the Simetry 24/7 helpdesk.
- For ease of product support, Simetry assigns each purchased Starlink an asset number, STL-xxxx. Locate your kit’s Simetryasset # and contact our 24/7 helpdesk for activation:
- Can’t get online?
- Make sure the cables are securely plugged in and there’s no damage or kinks.
- If you are still unable to connect to the internet, locate the system asset # and contact Simetry’’s 24/7 helpdesk for further guidance:
- phone: 1-833-746-3879
- email: support@simetry.com
Was this article helpful?
That’s Great!
Thank you for your feedback
Sorry! We couldn't be helpful
Thank you for your feedback
Feedback sent
We appreciate your effort and will try to fix the article