- Locating the Sim Slots
- You will notice that the BR1 Mini has a front side and a backside. You will want to start this process by unplugging the AC adapter from the power port of the BR1 Mini. To upgrade your service to the new T-Mobile SIM card that you received, we will be working with the back side of the modem. Here you will see a cover with a screw holding it in place.
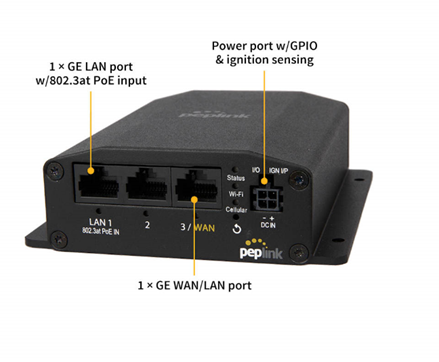
- You will notice that the BR1 Mini has a front side and a backside. You will want to start this process by unplugging the AC adapter from the power port of the BR1 Mini. To upgrade your service to the new T-Mobile SIM card that you received, we will be working with the back side of the modem. Here you will see a cover with a screw holding it in place.
- Removing the Cover to Reveal the SIM Slots
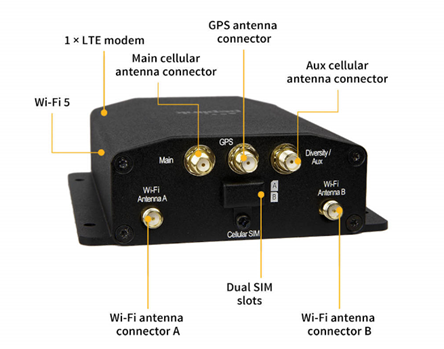
- Now, using a Phillips head screwdriver, you will remove the SIM slot cover. This will reveal the two slots. Slot A and Slot B will already have a SIM card inserted into the modem. You will need to remove the legacy T-Mobile SIM card from the slot previously specified to you. It is important to leave the other SIM card in your modem.

- Now, using a Phillips head screwdriver, you will remove the SIM slot cover. This will reveal the two slots. Slot A and Slot B will already have a SIM card inserted into the modem. You will need to remove the legacy T-Mobile SIM card from the slot previously specified to you. It is important to leave the other SIM card in your modem.
- Inserting the Verizon Sim
- You will need to insert the replacement T-Mobile SIM card into the same slot that you removed the legacy T-Mobile SIM card. You will want to insert the SIM card face down for SIM Slot A or face down for SIM Slot B. You will hear a clicking sound once the SIM card has been completely inserted. This will let you know that the SIM card has been inserted properly. Now, go ahead and cover the sim slots back up and fasten the screw.

- You will need to insert the replacement T-Mobile SIM card into the same slot that you removed the legacy T-Mobile SIM card. You will want to insert the SIM card face down for SIM Slot A or face down for SIM Slot B. You will hear a clicking sound once the SIM card has been completely inserted. This will let you know that the SIM card has been inserted properly. Now, go ahead and cover the sim slots back up and fasten the screw.
- Power Cycling the Modem
- Finally, you will plug the AC adapter back into the BR1 Mini’s power port. The modem will begin the bootup sequence and the status LED indicator will be a solid red color. After the status light turns green, the modem will be completely booted up. You will then wait for the cellular LED indicator to stop blinking and show as a solid green color. This will let you know that the modem is connected to the cellular network. Congratulations on your self-installation! If you have trouble getting your modem to come back online, please contact SIMETRY support via email at support@simetry.com or call us at 1-833-746-3879.
Was this article helpful?
That’s Great!
Thank you for your feedback
Sorry! We couldn't be helpful
Thank you for your feedback
Feedback sent
We appreciate your effort and will try to fix the article