BEFORE YOU START
Thank you for choosing Simetry. This guide contains instructions on how to release your Starlink kit so that Simetry can activate service for you. Before you start the transfer process, it is important to note the following:
- Equipment identifiers (serial numbers, etc.) must be provided to enable us to transfer the kit. To secure this information, you must either have access to your account in Starlink’s portal, or you must have the ability to physically retrieve the information from the equipment itself.
- If you originally purchased this equipment from another authorized reseller, that reseller must release the kit on your behalf prior to transfer. Please obtain the Starlink terminal ID, dish serial number, and kit serial number from them for each kit you wish to transfer. In the event they are unable to provide these details, you can physically retrieve the information from the equipment itself.
- Though subject to change, Starlink currently prohibits transferring service “until 120 days after you purchased your Starlink Kit, or 90 days after you activated your Starlink Kit, whichever comes first.” Note: if it has been 120 days since you purchased your Starlink from an authorized retailer and are having trouble transferring your Starlink, reach out to Starlink Customer Support and attach your receipt of purchase for further assistance.
- Your service must be cancelled in order to transfer Starlink hardware.
- Upon transfer, the Starlink is removed from your account permanently, service will stop immediately, and any remaining days of your service period will be lost.
- The account must be in good standing and paid in full.
- If your kit is (or recently was) active, there may be an overlap for the first billing period when the kit is transferred. Please be advised that this is out of Simetry's control. Customer is responsible for all Starlink Service charges.
3 SIMPLE STEPS
Transferring your Starlink kit is simple. The following pages will walk you through each of the three steps you will take.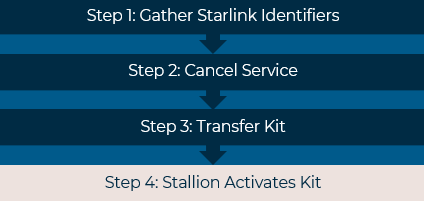
Once transferred, Simetry will add your kit to our master account via an unlock process. We will also then be able to create a new service line to activate service for that kit.
In the event you need assistance throughout the process, please contact the Simetry Starlink NOC.
- phone: 1-833-746-3879
- email: support@simetry.com
- Step 1: Gather Starlink Identifiers
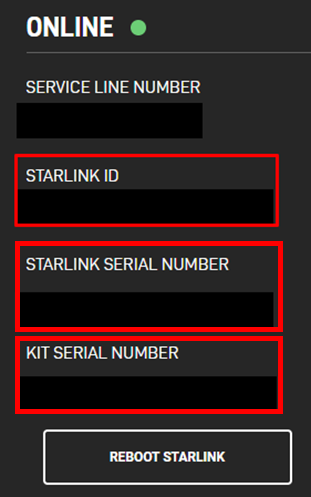
- To transfer your Starlink kit, we will need the following information (commonly referred to as “Starlink identifiers”):
- Starlink terminal ID
- Starlink dish serial number
- Starlink kit serial number
- All three must be provided for each kit. Do not proceed with transferring the kit until this information is gathered, otherwise, it will no longer be available in the portal.
- All three must be provided for each kit. Do not proceed with transferring the kit until this information is gathered, otherwise, it will no longer be available in the portal.
- To find the identifiers,
- Log into the Starlink portal.
- Go to the dashboard (Note, enterprise accounts have a “Dashboard” button at the top of the portal screen. For non-enterprise user types, the dashboard information will appear on the home page.)
- Locate & click on the “Manage” button to the right of the kit you want to transfer. The identifiers should appear as shown in the illustration above.

- In the event you do not have access to your account in Starlink’s portal, you can physically retrieve the Starlink identifiers from the equipment itself. Click here for Starlink’s latest FAQ on ways to find Starlink Identifiers, or follow the steps below.
- To find the Starlink Kit Serial Number:
- This is located on the Starlink Kit shipping label (ex. KIT00000000)

- This is located on the Starlink Kit shipping label (ex. KIT00000000)
- To find the Starlink Dish Serial Number:
- Refer to specific Starlink hardware type you have:
- Standard V3 or Actuated Dish: Located on the bottom of the Starlink Mast (ex. SN: 2ABC000000000000)
- High Performance Dish: Located on the bottom of the Starlink Mast similar to the Standard V3 or Actuated Dish (ex. SN: HPCP000000000000)
- Flat High Performance Dish: Located on the back of the Starlink Dish near the connector port (ex. SN: HPCP000000000000)
- Refer to specific Starlink hardware type you have:
- To find the Starlink Terminal ID:
- Found in the Starlink App while your Starlink is powered on.
- While connected to your Starlink internet, open the Starlink app, tap "Settings", then "Advanced". Look at the "ID" under "STARLINK" section. Enter the number without the "ut" in front. (ex. 00000000-00000000-00000000)
- To transfer your Starlink kit, we will need the following information (commonly referred to as “Starlink identifiers”):
- Step 2: Cancel Service
- Once you’ve noted the three Starlink identifiers associated with the kit you plan to transfer, you can proceed with cancelling service for it. To cancel service,
- Click on the “Manage” button to the right of the kit you want to transfer.

- Locate & click the “Cancel Service” button, as illustrated below.
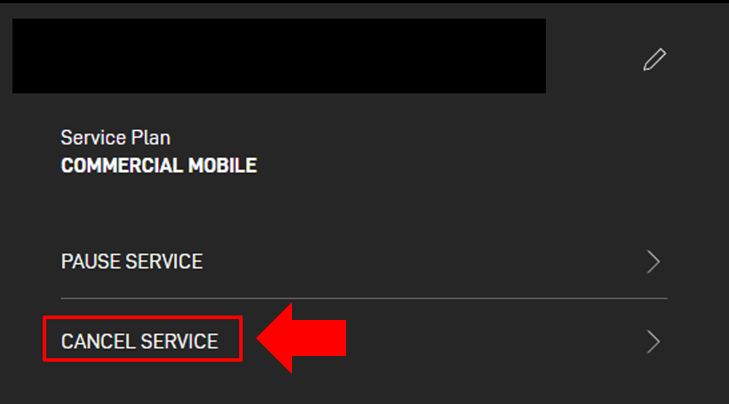
- Click on the “Manage” button to the right of the kit you want to transfer.
- Once you’ve noted the three Starlink identifiers associated with the kit you plan to transfer, you can proceed with cancelling service for it. To cancel service,
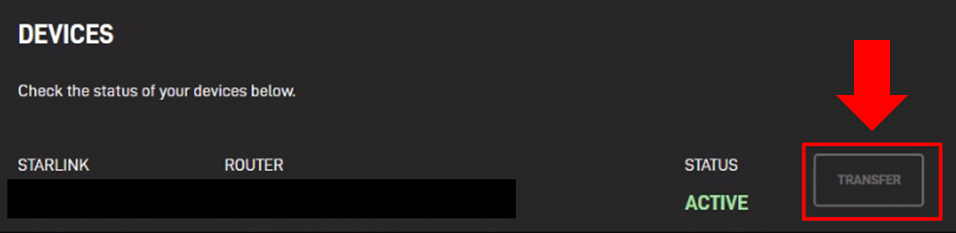
- Step 3: Transfer
- Now that you’ve cancelled service for the kit, you can proceed with releasing it for transfer. Before moving forward note the following:
- This will stop service immediately, even if you have already paid for the month.
- The “Transfer” button will only become accessible after the service has been cancelled.
- Transfer will not be available if there is an outstanding balance on the account.
- To release your kit for transfer:
- Click on the “Manage” button to the right of the kit you want to transfer.

- Locate & click on the “Transfer” button to the right of the device’s status (as illustrated below).
- Click on the “Manage” button to the right of the kit you want to transfer.
- Now that you’ve cancelled service for the kit, you can proceed with releasing it for transfer. Before moving forward note the following:
Was this article helpful?
That’s Great!
Thank you for your feedback
Sorry! We couldn't be helpful
Thank you for your feedback
Feedback sent
We appreciate your effort and will try to fix the article